

Hi friends,
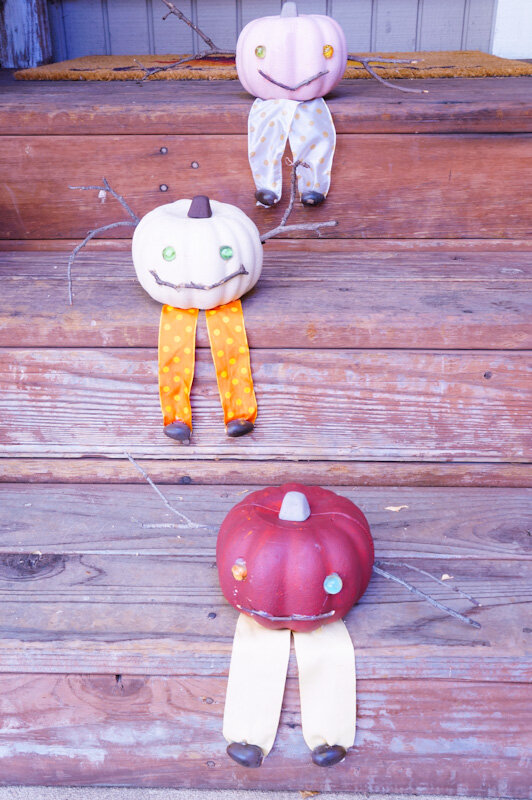
Today, we have super cute Mini Pumpkin Scarecrows. We put them out front with our pumpkins and can’t help admiring them lol They were inspired by fall, the corn maze we recently visited, and a creepy movie I saw as a kid. I’ll tell you more below. Today’s craft will either be creepy or cute, but that’s entirely up to you. Check it out below!
*Click on the photos for a closer look
What You'll Need
Foam Pumpkins
Twigs
Acorns
Marbles
Craft Paint & Brushes
Ribbon
Scissors
Glue Gun
Paper Plate/Newspaper
Optional: Hairdryer, Paint Tray, Whole Nuts in Shell, Real Pumpkin, Flat Marbles
The Steps
We want to see your craft! Click on PHOTO SUBMISSION and submit
STORYTIME:
Although I love sharing old childhood movies with my kids, this may be one we skip until they’re much older. This is totally aging me now, but Return to Oz was sort of a part 2 to The Wizard of Oz, with a much darker storyline. It had some lovable characters and one similar to these little pumpkins- a short, round robot named “Tik-Tok,” and others way too creepy for kids.


FOAM PUMPKINS
We found items outdoors to use and others at our dollar store. We’ll give you an option for using real pumpkins and a few ways to hang the foam ones further down.
*Skip to step 5 if you don’t want to paint.
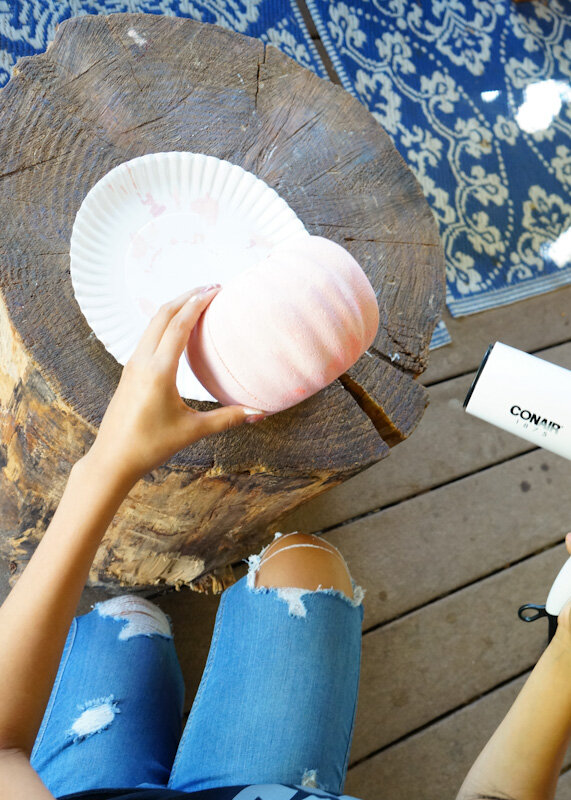
Remove your stem and paint the pumpkin. (This pumpkin was originally painted a peach color, then I mixed the peach with the wine and got a subtle lavender color.)
Let the pumpkin dry on a paper plate/newspaper, or use a hairdryer.
Paint any exposed areas or add a second coat. Let it dry.
If you have multiple pumpkins, paint as well.
REAL PUMPKINS(not shown)
Leave the stem on if attached.
Follow the above steps, then continue with the steps below.


4. Paint your stems if you’d like.


LEGS
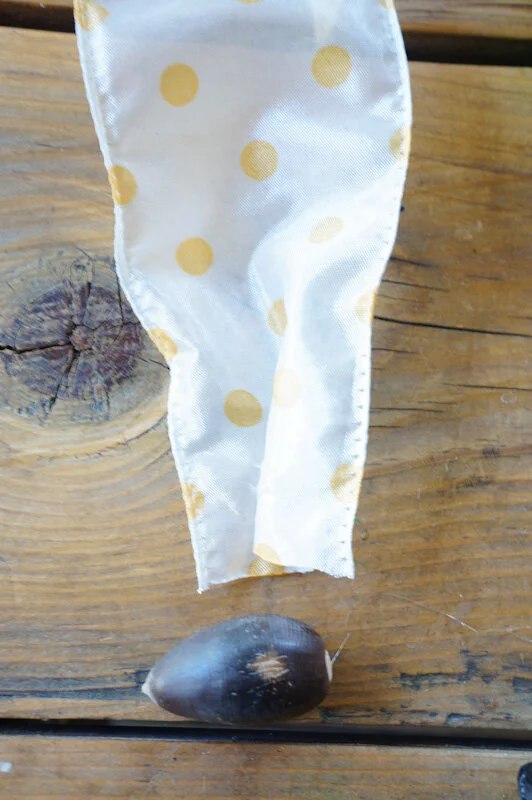
Cut 6inches or more of ribbon for each leg. For a wide ribbon, add a dab of glue and carefully create a pleat.
Add glue to the bottom of each leg and add the acorn or a nut (pecan, peanut, walnut, etc) in its shell.
Optional: glue a small rock to the back to help balance if necessary. Longer legs could cause the pumpkins to tip forward.


FACE
With a twig, poke a hole for each eye socket. REAL PUMPKINS(not shown). Glue flat marbles for the eyes.
Add some hot glue to the socket and glue the marble to it.


3. Glue twigs for the mouth
4. Poke the twig arms into each side. REAL PUMPKINS(not shown) poke a hole with a screwdriver.
HANG foam pumpkins- After poking the armholes, run some wire or firm twine through them. Make sure it’s enough to hang. Twist/tie at the top, add a bit of glue for the arms, and then insert them.
OR Tie a loop of string to the center of a headless nail, push entirely through behind the foam stem(use a second nail to help feed it through) and pull. Tie a knot at the base of the pumpkin head to secure the string. The nail should stay in place, allowing for a more discreet loop for hanging.
ASSEMBLE
Attach the stem back on (foam pumpkin).
Turn the pumpkins upside down and glue the legs/feet facing down.
That’s it!
I just love these little guys. They’re like little pumpkin kids haha.


To stand pumpkins up- Insert a stick (length is up to you) into the bottom of the pumpkins, glue if you’d like, then wedge the stick into the ground.

In true mom fashion, I had the “kiddos” pose in different spots LOL
Happy crafting!
Amanda and Naomi
To share: take a photo of your craft and let us see it! Click on photo submission and submit the photo.


